Friday, December 17, 2010

Create an event receiver script within your ActiveScriptEventConsumer with PowerEvents

I’ve had the pleasure of meeting Trevor Sullivan when I convinced him he should learn all about SQL Server.  Not really, but we did chat it up on Twitter and decided to both go to Cleveland for an intro on SQL Server 2008 R2.  Little did I know what he was working on.  Quite simply one of the coolest projects I’ve used from Codeplex.  Trevor has created PowerEvents!  I’ll admit, some of it is way over my head at the moment.  It’s directly related to how much I really know about WMI, but I feel that’s about to change drastically.

I posted a tweet earlier about what I’ve created with PowerEvents.  Actually, I feel as if it would be a best practice for the ActiveScriptEventConsumer.  You can be the judge of that Winking smile.  Since it’s almost impossible to see what you’ve created as an Event Consumer, I’ve simply created only one: ActiveScriptEventConsumer.  That way I don’t have to worry about what has been added under the hood to WMI.  All I have to do is tweak the script that is fired when the event occurs.  So, I’ve built a basic script that looks for the arguments you have passed to it.  Based on these arguments, you can dynamically call different scripts or functions.  Pretty slick, eh?  Here’s a basic script that will email two different people based on what the WMI query results are.

Option Explicit
Const strFrom = "example@example.com"
Const strMailserver = "smtp.example.com"
Const strSchema = "http://schemas.microsoft.com/cdo/configuration/"
Dim objArgs, objEmail
Dim strProcessName, strSubject, strBody, strTo
'Get arguments from command line
set objArgs = WScript.Arguments
strProcessName = WScript.Arguments(0)
strSubject = WScript.Arguments(1)
strBody = Wscript.Arguments(2)
'Dynamically change the email recipient
'Or even change the function to be called
'Or call a completely different script: .bat, .vbs, .ps1
'Endless possibilities
If strProcessName = "NotePad.exe" Then
	strTo = "myboss@example.com"
ElseIf strProcessName = "Outlook.exe" Then
	strTo = "me@example.com"
End If
'Call to send email, but many different functions could be within this script and
'dynamically called based on arguments
Call SendEmail(strSubject, strBody)
'Function(s)
Sub SendEmail(Subject, Body)
	Set objEmail = CreateObject("CDO.Message")
	objEmail.From = strFrom
	objEmail.To = strTo
	objEmail.Subject = Subject
	objEmail.Textbody = Body
	objEmail.Configuration.Fields.Item _
	    (strSchema & "sendusing") = 2
	objEmail.Configuration.Fields.Item _
	    (strSchema & "smtpserver") = strMailserver
	objEmail.Configuration.Fields.Item _
	    (strSchema & "smtpserverport") = 25
	objEmail.Configuration.Fields.Update
	objEmail.Send
End Sub
'Clean up vars
set strProcessName = nothing
set strSubject = nothing
set strBody = nothing


I hope you find this useful.  I’m brand new to creating PowerEvents, but I do feel this is the best way to handle scripting based on events.  Feel free to post a comment if I’m an idiot Rolling on the floor laughingand there is a much easier way…

Saturday, December 4, 2010

Download pictures from HootSuite: Ow.ly

Maybe you have noticed, maybe you haven’t, but when you send pictures to this service, you cannot download them from their website.  Right click as much as you want, you’ll never get a Save Picture As option.  That’s a major flaw in my book.  I send pictures to the cloud not to lock them into a vault.  I send them because I’d like to share them!  These pictures are not yours HootSuite, they are mine and will always be mine!

What can you do about it?

Being the curious guy that I am, I noticed an embed link on the page.  Let’s look at this one for example: http://ow.ly/i/65gE.  Cracking open notepad, I pasted this link and saved the .txt file to a .htm.  Upon opening the newly created web page, I see my beautiful picture with all of it’s glorious pixels.  Well, it’s not that great of a photo, but the end result is gratifying.  Since I’m now viewing a web page with MY photo on it, that isn’t controlled by HootSuite, I’m able to right click the page and Save Picture As. Winking smile Ha ha, I win HootSuite…  When you save the photo, the file type is defaulted to a .gif.  Go ahead and save it as a .gif.  When I did this earlier, I tried opening my picture, but it didn’t display my photo…  Did HootSuite one-up me again?!?  Absolutely not!  Right click that .gif file and select edit.  This will open the picture up in MSPaint.  Then simply save this photo as a .jpeg or .jpg.  Congratulations, you now own your digital media…. again!

I OWN MY PHOTOS HOOTSUITE and it’s quite ridiculous that I have to resort to these tactics just to share my digital life.  What if my friends or family wanted to download that photo?  Give up the policy of what is yours is mine and what’s mine is mine.  It’s so not attractive.Steaming mad

Sunday, November 28, 2010

Clean up your PC this holiday season…

In the last day, I’ve had 3 PC’s dropped off to me all for the same reason: “Can you take off all of the garbage that comes with this and make it as fast as possible?”.  Laptops are horrendously crippled machines out of the box.  It all boils down to advertising.  The Bing bar does absolutely nothing for the end user other than running in the background wasting resources.  The same goes for the classic Adobe Reader auto run entry in the registry.  It’s all a bit of rubbish if you ask me.  There is absolutely no need for a netbook running Windows 7 Starter edition to have 16 .exe’s firing upon startup.  Look at it, I’m not making it up:

image

Most, if not all listed here is software that is a bunch of gunk!  I’m completely baffled as to why most software vendors feel the need to attach every bit of itself to the startup process.  It’s Windows 7 people!  If you absolutely need to have your .exe running in the background, fire it up as an Automatic Delayed Service.  Operative word: Delayed…  This will run after the computer freed up a few resources that are tied up during the login process.  It’s a no brainer these days to take advantage of that capability.  However, since this seems to be the status quo, I’ll continue to shake my head and collect my paycheck *fixing* what shouldn’t ever have been broken.  Here’s a few steps that you can take to optimize your brand new computer.

  1. Grab Revo Uninstaller – Beginner Level
  2. Grab CCleaner – Beginner level
  3. Grab Autoruns – Advanced level

Depending on how in-depth you’d like to go, I’ve marked each software with a level.  Each of these can do major damage to your brand new machine, so use caution.  If you’d rather leave it to an expert, I can always be reached.  While I never use Revo Uninstaller, I’d like to show beginners some of the options available.  I go through the list in Programs and Features picking off non-essential software.  After a while, you just get an eye for it.

What do I look for?

I rip out arguably more than I should, but that’s just me.  I OPTIMIZE Winking smile.  The usual targets are any power management softwares, widget bars, pre-loaded games, the stupid trial version of anti-virus… By the way, don’t pay for an anti-virus.  Yeah, I said it!  They all are garbage, but since you HAVE to use one, use Microsoft Security Essentials.  It’s free and less intrusive than the other free options out there.  Getting back to the list of garbage: Toolbars, preloaded screensavers, the Acrobat.com entry (To this day, I’ve never found out what that actually does.), DVD programs, Label printing software (Who uses a netbook to print labels?).  Everything I’ve listed here, Windows 7 can do out of the box; and a mighty fine job of it, if you ask me. 

Don’t Accept OOTB

It’s necessary for you to optimize your computer even though it’s brand new.  It’s a sad fact, but nonetheless, a fact.  If you use different techniques to make your PC more efficient, feel free to post a comment.  I love hearing about how other people are dealing with this.

Wednesday, November 24, 2010

SharePoint: Integrate ASP.net controls with Forms – Pt6: Bonus: Embed documents to page

Pt.1: Use an SP Datasource to push values to a drop-down menu control
Pt2: Adding a DVWP Form to the page
Pt3: Update the DVWP Form using a Drop-Down
Pt4: Trimming Drop Down List results using CAML
Part 5: Force Selection within Drop Down List
Pt6: Bonus: Embed documents to page

I’ve been thinking about a few comments I’ve received during this series.  Specifically, this comment in particular from Jeremy on EUSP: “Would adding a document view/preview window be possible? It sounds like it might fit into where you are headed with this project.”  I initially wrote that it would not be possible without some code.  That comment is still valid, but I’ve went ahead and wrote the code to display certain document types.  Initially this XSL template will handle: .pdf’s, png’s, jpg’s, gif’s, mp3’s, wmv’s and .vsd’s.  I’m sure there’s more to add, so feel free to post a comment if you’d like to see something added!

SPXSLT

I’m a big fan of this project.  Isn’t it obvious?  My avatar on Twitter was the SPXSLT logo for a week or so.  If you haven’t been to the codeplex site and used these templates, you now have no reason…

What does it do?

I’m going to go over the most complex file type.  This should give you a good understanding of how all of the other file types work.  Let’s give credit where credit is due. http://www.wssdemo.com/Pages/visio.aspx is where you can find this code:
 <OBJECT classid="CLSID:279D6C9A-652E-4833-BEFC-312CA8887857" 
codebase="http://www.microsoft.com/downloads/info.aspx?na=90&p=&SrcDisplayLang=en&SrcCategoryId=&SrcFamilyId=d88e4542-b174-4198-ae31-6884e9edd524&u=http%3a%2f%2fdownload.microsoft.com%2fdownload%2f6%2ff%2f5%2f6f569198-e7d0-49af-b162-54a11f38d301%2fvisioviewer.exe" 
id="viewer1" width="100%" height="100"> 
<param name="BackColor" value="16777120">
<param name="AlertsEnabled" value="1">
<param name="ContextMenuEnabled" value="1">
<param name="GridVisible" value="0">
<param name="HighQualityRender" value="1">
<param name="PageColor" value="16777215">
<param name="PageVisible" value="1">
<param name="PropertyDialogEnabled" value="1">
<param name="ScrollbarsVisible" value="1">
<param name="ToolbarVisible" value="1">
<param name="SRC" value="http://www.wssdemo.com/Shared%20Documents/carpark.vsd">
<param name="CurrentPageIndex" value="0">
<param name="Zoom" value="-1">
</object>


This code allows you to embed visio files within IE (Internet Explorer).  I know, I know, it doesn’t work in Chrome or any other browser for that matter, but it’s still nice if you have an audience that will be using IE only.  I’ve tried to make all of the other file types adhere to standards, so they all should work no matter what browser you use. 


Breaking It Down


To use this template, you have to call it like this:


<xsl:call-template name="EmbeddedFilePreview">
 <xsl:with-param name="FileType" select="@File_x0020_Type"/>
 <xsl:with-param name="FilePath" select="@FileRef"/>
 <xsl:with-param name="paramHeight" select="500"/>
 <xsl:with-param name="paramWidth" select="1000"/>
 <xsl:with-param name="curr_Site" select="$curr_Site" />
</xsl:call-template>


The FileType, FilePath, and curr_Site parameter are required if you are wanting to display .vsd files in your page.  For some reason, the .vsd object requires a full URL and not a relative path.  To get the current site, you’ll want to setup a Server Variable: SERVER_NAME.  You’ll see why that’s important within the .vsd file type.  All of the other file types that you would display using this template *do not* require the curr_Site variable.  There are two other variables that are optional.  They are paramHeight and paramWidth.  If these aren’t set when you call the template, the values are defaulted to 500px and 100%, respectively.


Here’s the SPXSLT code to embed a visio document:


<xsl:when test="$FileType = 'vsd'">
 <xsl:choose>
  <xsl:when test="$curr_Site = ''">
   <b>The current site parameter *must* be provided!</b>
  </xsl:when>
  <xsl:otherwise>
   <object>
    <xsl:attribute name="classid">    
     <xsl:text>CLSID:279D6C9A-652E-4833-BEFC-312CA8887857</xsl:text>
    </xsl:attribute>
    <xsl:attribute name="id">    
     <xsl:text>VSDViewer</xsl:text>
    </xsl:attribute>
    <xsl:attribute name="width">
     <xsl:value-of select="$Width" />
    </xsl:attribute> 
    <xsl:attribute name="height">
     <xsl:value-of select="$Height" />
    </xsl:attribute>
    <xsl:text disable-output-escaping="yes">
    &lt;param name=&quot;BackColor&quot; value=&quot;16777120&quot;&gt;
    &lt;param name=&quot;AlertsEnabled&quot; value=&quot;1&quot;&gt;
    &lt;param name=&quot;ContextMenuEnabled&quot; value=&quot;1&quot;&gt;
    &lt;param name=&quot;GridVisible&quot; value=&quot;0&quot;&gt;
    &lt;param name=&quot;HighQualityRender&quot; value=&quot;1&quot;&gt;
    &lt;param name=&quot;PageColor&quot; value=&quot;16777215&quot;&gt;
    &lt;param name=&quot;PageVisible&quot; value=&quot;1&quot;&gt;
    &lt;param name=&quot;PropertyDialogEnabled&quot; value=&quot;1&quot;&gt;
    &lt;param name=&quot;ScrollbarsVisible&quot; value=&quot;1&quot;&gt;
    &lt;param name=&quot;ToolbarVisible&quot; value=&quot;1&quot;&gt;
    &lt;param name=&quot;SRC&quot; value=&quot;http://</xsl:text>
    <xsl:value-of select="concat($curr_Site, $FilePath)"/><xsl:text disable-output-escaping="yes">&quot;&gt;
    &lt;param name=&quot;CurrentPageIndex&quot; value=&quot;0&quot;&gt;
    &lt;param name=&quot;Zoom&quot; value=&quot;-1&quot;&gt;</xsl:text>
    <p>It appears you don't have a Visio Viewer plugin for this browser.</p>
   </object>
  </xsl:otherwise>
 </xsl:choose>
</xsl:when>


You’ll notice the test is to see whether or not curr_Site is blank.  If the curr_Site and FilePath match a document, then it’ll embed the visio drawing into the page.  I do a little bit of magic with the concat in the middle there, so if you are trying to use this in an SSL environment, change the text to: https://.


Where’s the code?


The preview is only shown here.  I’m going to post all of the code to the SPXSLT site, so get the latest revision there.  If you have any tweaks for me or need to get this working, I’m always glad to hear from you.


Screenshots?


You know I have screenshots!  Here’s a visio drawing:


image


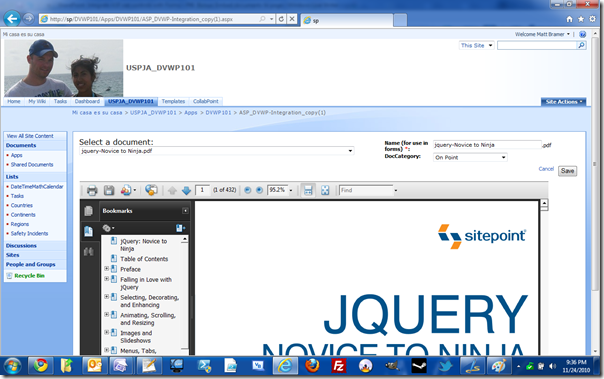
Here’s a .pdf:


image


Here's a .jpg:


image


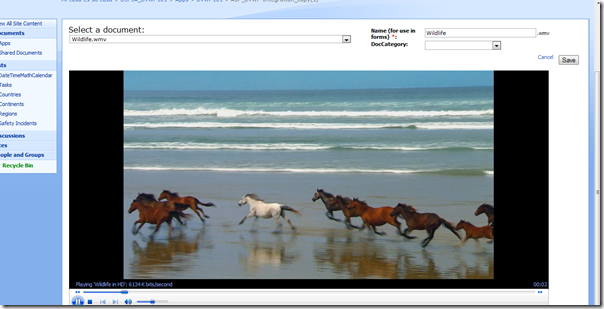
Hey, why not a video? .wmv


image


Update:
The code for this template can be found here:
http://spxslt.codeplex.com/discussions/235951

Thursday, October 28, 2010

SharePoint: Integrate ASP.net controls with Forms – Part 5: Force Selection within Drop Down List

Pt.1: Use an SP Datasource to push values to a drop-down menu control
Pt2: Adding a DVWP Form to the page
Pt3: Update the DVWP Form using a Drop-Down
Pt4: Trimming Drop Down List results using CAML
Part 5: Force Selection within Drop Down List
Pt6: Bonus: Embed documents to page

So Close!

You may have noticed the Drop Down control has a bug. When you visit the page, an item is already selected but the EditForm isn't displayed for that item. The best I can tell is the value for the Drop Down is set before the EditForm is ready to accept a connection. Don't worry though; we can fix it with just a few tweaks to the control.
First we must select/click/highlight (pick your pleasure) the Drop Down List so we can open the Tag Properties for this control. With anything you set out to do, there is always more than one way to get it done. You can select the control and then Click Task Panes, Tag Properties; or you can simply double click on the Drop Down List.
image
The settings we are interested in are:
  • AutoPostBack
  • ToolTip
  • AppendDataBoundItems
  • DataSourceID
  • DataTextField
  • DataValueField
  • Misc – Items
You may have noticed already, some of these properties are highlighted in blue. This happens when you customize a setting for this control. Remember checking the AutoPostBack option in Step 1? Since some of these properties have already been set, we don't need to worry about them. I've listed them above so you when you want to deep dive into the inner workings, you'll have a good base to start from.

Ready, Set, Config!

Let's set the ToolTip first. This gives a visual indicator to the user of the page. When you hover over the Drop Down List, a notification will appear. These are extremely useful when trying to give simple tips to your users. For this property, we are allowed to type our message directly into the box to the right.
image
You'll notice some properties work differently. Some only give you a True/False selection. By using these controls, you'll become more familiar with these properties and how each one works. AppendDataBoundItems is a prime example of why it's necessary to become familiar with these controls. It's difficult to decipher at first glance what this really does. From trial and error, I've found out that it actually solves our problem. Let's set it to True. By doing that, the items that we add in the next step will be appended to the Drop Down control. If that's still confusing, after you complete all of the steps and get the page working, go back and set this property to False. The last property we have to set is under the Misc heading and it's called Items. This allows us to manually add items to select from our Drop Down List. Click the ellipses on the right of Items, so we can add an item.
image
This brings up a rather odd looking dialog, but once you know what it's doing for you, you'll get that raise from your boss! Click Add and then configure this item to:
  • Enabled:True
  • Selected:True
  • Text:Select a document…
  • Value:Select a document…
image
It's important to note, the property Value plays a very important part here. Remember in Step 3, we configured the parameter to filter our EditForm when the ID equals the ID of the SPDatasource. Since we've set the Value here to: Select a document…, there's no possible way the Drop Down List will filter to an EditForm. With this in mind, it's definitely possible to *NOT* have your Drop Down bound to an SPDatasource and manually insert items with values. You could then filter based of off whatever you'd like to. Do I recommend it? No, because it's just as easy to bind this control to a list and update the values there. It'll keep you from having to dip into SPD just to add more functionality down the road.

HOORAY!

Guess what? We've done enough to merit saving the page. While we are at it, go ahead and open this page. Do you notice anything different? At this point, you should have: Select a document…, as your initial selection. With this in place, your users are now forced to make a selection and aren't stuck wondering why your Drop Down isn't working when the page is initially loaded.
image
If you’ve followed along from the beginning, we have just finished building a Drop Down List that’s automatically populated with Items the current user has created.  Upon selecting an Item, an EditForm appears and allows for easy manipulation of metadata.  There’s a nagging question to all of this:  What else can I do with these techniques? That's an awesome question because using this techniques; you are able to add functionality to your page that you simply can't find anywhere else in SharePoint. I'll leave it up to you to post comments on how you are using this or how it could be used. I definitely have some ideas for follow-up posts and have a project coming up that I'm going to be using this extensively. I'd still love to hear from you guys though, so don't be shy in the comments!