Works on WSS 3.0 and MOSS 2007
This post will show you to create a hyperlink in a Data View Web Part (DVWP) that open’s a customized NewForm.aspx. When the NewForm.aspx opens, it’ll have some of the required inputs already filled out for you. We’ll set this magic up by using DVWP and parameters passed from the DVWP to the NewForm.aspx.
I need to show you how I have my lists setup first, so let’s dive into that for a minute. I have two lists setup: 1. Calendar with two custom columns. These two columns are Job # and Job Name. The rest is default or whatever you’d like to have. The next list I have is a Tasks list that has these two custom columns as well. Here are some screen shots:


You should take notice that I’ve required Job # to be inputted on each form. This is a must because it’s our primary key, if you will. This is going to be used for filtering later on, so it’s important.
Now that we have those lists setup we can now create our custom dashboard that allows hyperlink filtering and our magical custom newform.aspx. Fire up sharepoint designer and create a new aspx page. Add a webpart zone to your page, so we’ll have a spot to place our DVWP. Now we’ll want to click on Data View, Insert Data View. Inside our Data Source Library, we’ll highlight the Calendar. Then you’ll select show data. This will allow us to select the rows we’d like to appear in our DVWP. I usually only select one row and then click the Insert Selected Fields As: Multiple Item View. After I get the DVWP to show up on my page, then I’ll choose to edit the columns as they seem fit. SAVE YOUR WORK! We’ll call this page: Dashboard Right now, we want to see only the Job # and Job Name fields from the calendar list. Now we need to add a column to the DVWP. This will provide us a place for an additional hyperlink to our Custom NewForm.aspx. In the new column, pick any row that has a job # and then type “Add Task…”. If you have done it right, it’ll populate your entire DVWP.
Here’s a quick glance at what it should look like:

Once you get this setup how you like it, we’ll need to add two parameters to our DVWP. When you highlight the DVWP, you’ll see a chevron on the right of it. That is a menu for Common Data View Tasks. Listed inside this menu is our parameters section. Open that and add two Query Strings. Here is a photo to guide you along:
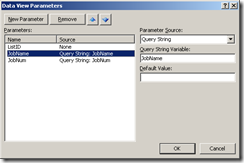
We’ll need these in order to carry information from our Dashboard to our CustomNewForm.
We now need to create another new aspx page and customize it. This will be our custom NewForm.aspx. I called it AddTask.aspx, but you certainly can make it whatever you like. I saved my page in the same place where the NewForm.aspx is for the Tasks list that I’m using. Once we have added a new web part zone to our page, we can now add a custom form. If you follow the same steps as above to add a new DVWP, you’ll be fine. There are a few differences from what we did before though. You will add the DVWP as a New Item Form instead of Multiple Item View. Also you’ll want to make sure the DVWP is for the Tasks list and not the Calendar. You’ll also want to customize the inputs as you seem fit. Be sure to include any required fields on your Tasks list on your AddTask.aspx page. Also make sure that Job # and Job Name are inputs on your AddTask.aspx page. Ok once that has been setup, now we can get down to the magic.
We’ll now delete both of the text boxes for Job # and Job Name. We are going to replace them with our own. Highlight the form where you’d like for them to show up, and then select Insert, ASP.Net Controls, Text Box. We have to do that because when using the DVWP for a new item form, it wouldn’t allow me to alter the Value property. When I do it this way with our own ASP.Net control, I’m able to. Now we need to make these text boxes reference our Tasks list. There will be a little chevron on each text box. Clicking that will give us the options we need. Change the data field for both to relate to the field you need. i.e. Job # = Job #, you get the idea. Now switch to code view and drop a few custom lines of magic. First we need to add our Query Strings as a parameter for our page to use. This is the code we need to add:
<ParameterBinding Name="JobNum" Location="QueryString(JobNum)" DefaultValue="Please Type a Job Num" />
<ParameterBinding Name="JobName" Location="QueryString(JobName)" DefaultValue="Please Type a Job Name" />
You’ll need to search the code view using:
<ParameterBinding Name
Just paste the code provided above in the <ParameterBinding Name section. I usually just search the code view for <ParameterBinding Name using ctrl+f. Put these two lines of code below everything else in this section. Now we need to add these two lines in the <xsl:stylesheet section as a parameter. Using the same logic as above, I searched the code view for <xsl:param This can be a bit convoluted because there are many <xsl:param under many other xsl:template names. I added mine directly under the xsl:stylesheet. You’ll find a few parameters there, so add them accordingly. Here is the code that you need to add:
<xsl:param name="JobNum" />
<xsl:param name="JobName" />
Now we need to add a value to our customized text boxes. Again search the code for Job Name. Below that is the text box code. It begins with:
<asp:TextBox runat="server"
We need to modify this line and add one attribute:
value=”{$JobName}”
Your text box code should look like this… I suggest only to add the line of code above and not copy what is listed below!
<asp:TextBox runat="server" id="ff10{$Pos}" value="{$JobName}" text="{@Job_x0020_Name}" __designer:bind="{ddwrt:DataBind('i',concat('ff10',$Pos),'Text','TextChanged','ID',ddwrt:EscapeDelims(string(@ID)),'@Job_x0020_Name')}" />
Now change the Job # text box the same way except we’ll add this line of code instead:
value=”{$JobNum}”
SAVE YOUR WORK! We need to add one last thing to our Dashboard page and that’s our magic hyperlink! With that page open in Design View, highlight the “Add Task…” text that we added above. Right click and select hyperlink. We have to link this page to our AddTask form and add our parameters. Our link should look like this:
http://addtasks.aspxurl/?JobNum={@Job_x0020__x0023_}&JobName={@Title}
Save this page on final time and cross your fingers because I think we are ready to test this baby out! Open your Dashboard page and click Add Task… This should open your AddTask.aspx page and automagically fill out Job # and Job Name.
If you like this or need some clarification, please feel free to drop me a comment.


![DVWP - [Row Number]](https://blogger.googleusercontent.com/img/b/R29vZ2xl/AVvXsEi-A9aJaIRJ7p7GemlXW7ZzHgI0yAApkVEC605pcBw0aVhkEXfaVEQnPlrRiuWj8ekxLosJnQpDQNDOxCZfT_0QgZaj6N5vxAFg2MGIygCLa-cbQZdstLGCdUxk8CmhYQZMSjMhmYxVY3Cp/s1600-h/DVWP%20-%20%5BRow%20Number%5D%5B5%5D.jpg "DVWP - [Row Number]")


